
After 37 Years, the Game Boy Finally Got Its Own Printer Software

Updated: 5 hours ago

Content and Introduction
Strictly speaking, the headline is not true. The Game Boy Printer arrived in 1998 with software of its own. The Game Boy Camera printed photos, Pokémon Yellow printed its Pokédex, and a handful of other games could put a picture on paper.
What it never had was a program that lets the person holding the Game Boy decide what goes on the paper. Thirty-seven years after the Game Boy and twenty-eight after the printer, that program now exists. It is called LABEL BOY.
I am fully aware that in 2026 this is mostly a joke. A phone, a laptop and the label printer from any office supply shop do all of it faster, sharper and on paper that is still being made. But to me, the printer from Nintendo has always felt unfinished. A printer that only prints what somebody else decided is half a printer, and this cartridge is the other half, delivered a little late.
It is the third cartridge built here, after The GB Museum on a Cartridge and the diagnostic GB Test Lab.
An early alpha, and an invitation LABEL BOY is an early alpha and a one-person hobby project under semi-active development. I do not test every update thoroughly, so the cartridge may well still contain bugs. Please try it, and please tell me what breaks: a code that would not scan, a label that came out wrong, anything at all. And if you are missing a feature you would want, I would genuinely love to hear it. Friendly, constructive feedback is worth more than gold here, and it is the quickest way to make the cartridge better. |
System Requirements
|
Nintendo built the printer, nobody built the label maker
The printer is a small thermal machine with a print head exactly as wide as the screen, 160 dots. Its paper is self-adhesive and came in three subtle tints rather than bold colours: a neutral white, a warm yellow and a cool blue, much like the warm, neutral and cool of lamplight. Nintendo sold a sticker printer in 1998, but it only ever printed what a game offered: photos from the Game Boy Camera, a handful of template stickers, a page of the Pokédex. What you could never do was simply type what you wanted and print it.
This did not start as a practical problem. It started as the thing I would have loved to print as a child: not a photo or a Pokédex page the game handed me, but my own words, my own stickers, whatever I could dream up. The printer could obviously do it; nothing ever let me. Coming back to it years later, the tools I found were drawing apps, photo printers and a clever homebrew that turns doodles into on-screen QR codes. None of them lets you simply type text, a code and a layout and print a label. So I built the one that does.
So I did what any reasonable adult does with a sticker printer from 1998: I spent precious time teaching it to create labels.
Thats what I ever hoped for that the printer is able to do:
A label you can see while you make it
The one thing a label maker has to get right is the preview. You are making something physical, so you should see it exactly as it will come out of the printer, not as a list of settings. So LABEL BOY shows the label itself, full size, and every change appears on it the moment you make it.
You start from a template rather than a blank page: a plain label, a shelf label, a numbered box, a website QR code, a cable flag or a card for the Barcode Boy. From there the controls stay the same everywhere. Up and down move between the parts of a label, with small corners marking the one you have selected; left and right change its setting; and SELECT steps to the next one: size, bold, alignment, grey shade, or turning a part to run along the roll. The footer always shows what A will do on the line you are on, so you are never guessing.
Two small touches make it easy to live with. A part can be moved past its neighbour to reorder the label, and behind the last part there is always a slot to add the next one. And any change can be undone, then redone by pressing again, which is a little more forgiveness than the Game Boy itself ever offered.
Typing with a D-pad
There is no way around it: text on a Game Boy is typed letter by letter on a grid. The keyboard has four pages: small letters, capitals, signs, umlauts and symbols. A label for a German shelf needs ä, ö and ü more than it needs a heart, but it has the heart as well.
Thirteen symbols are drawn by hand, seven dots tall: arrows, a warning sign, a wine glass for fragile boxes, an umbrella for keep dry, a heart, a note, a D-pad, a phone and a tiny Game Boy. A recycling sign was planned and dropped, because three arrows in a circle are just a smudge at seven dots tall.
Four saved snippets hold text typed once and inserted with a single key, such as the start of a web address. After the third time typing https on a D-pad, they stop feeling like a luxury.
QR codes calculated on a Game Boy
The museum cartridge renders its 355 QR codes in advance on a PC, because every link is known before it ships. A label maker has no such luck. Nobody knows what will be typed, so here the Game Boy has to build every code itself.
It takes the text, splits it into blocks, adds the error correction that lets a phone read a creased code, and draws every module. It handles the first ten sizes at all four correction levels, which is more than anyone will ever type with a D-pad.
A new code first asks what it is for: a web address, Wi-Fi access, a contact card, a phone number or any text. For Wi-Fi it asks for the network and the password and builds the code a phone understands. It also prints both in plain text underneath, for the one guest whose phone has no camera.
Umlauts were the last trap. On the cartridge an ä is simply the next glyph in the font, but a phone expects something else entirely, so every special character is translated on its way into the code. A word like Grüße now encodes the way a phone expects, instead of coming out as gibberish.
Barcodes, and why they lie down
Barcodes posed a different puzzle. A typical EAN-13 is 113 modules wide including its quiet zones, and the print head has 160 dots. At one dot per module most scanners give up. So when a code does not fit across, LABEL BOY turns it by ninety degrees: the bars run across the paper and the code grows along the roll, where there is no limit.
There is a word of caution built in as well. EAN numbers are issued by GS1 to the companies that make the goods. The cartridge will encode any number and calculate the check digit, but for numbers of one's own it suggests Code 128, which takes any text and belongs to nobody.
Twenty labels from one
Most labels come in batches, and LABEL BOY can print a whole run from a single layout. The simplest way is a counter: drop one into the text and it counts up by one on every copy, so one label becomes twenty numbered boxes in a single run. A list does the same for words. You type a list of up to 64 lines once, place a list marker on the label, and each copy takes the next line from the list.
That is how you label a drawer of cables or a shelf of jars: type the names once, print them all. And between two labels the printer can lay down a dashed cut line instead of winding to the tear-off edge, which saves a surprising amount of paper that nobody makes any more.
Saving, and printing it again
Fourteen finished labels fit in the cartridge's memory, plus the last one printed. Print again in the main menu repeats that one without touching the label being worked on, which is exactly what is needed when the first copy came out crooked.
A card for the Barcode Boy
In 1992, six years before the printer, Namco sold a barcode reader for the Game Boy in Japan. Its games turn the number on a card into a fighter or a monster, and they do not look the number up: any number gives a result, and a new number gives a creature nobody has seen.
A word of honesty here: this card has never actually been tested. It is built purely from the published Barcode Boy specifications, so whether the printer's dots are fine enough for Namco's 1992 reader is a question only real hardware can answer. If it works, a printer from 1998 will feed a reader from 1992, which would quietly be my favourite thing in the whole project. If you have a Barcode Boy and can try it, I would love to hear how it goes.
Testing the printer before trusting it
From the Test Lab, LABEL BOY inherits a printer check that uses no paper. It asks the printer who it is, how it feels, whether the cable is clean and whether the motor turns. Then come the tests that do use paper: a dot check for dead heaters and an exposure ladder that finds the darkness this paper still needs.
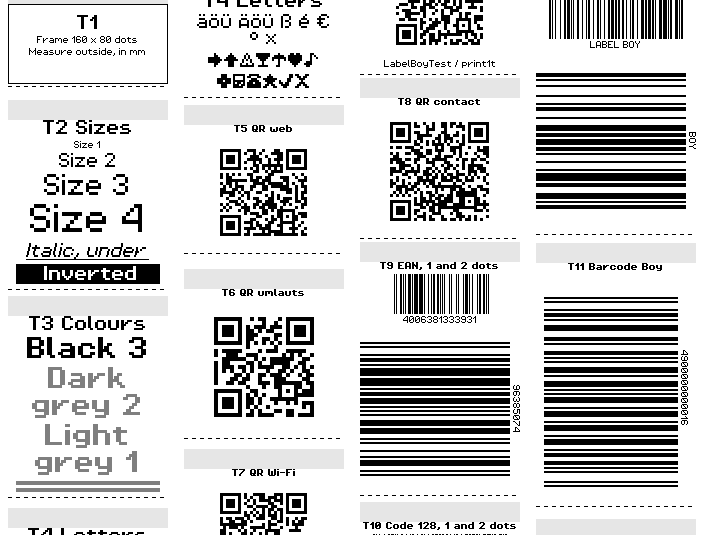
New is the Test sheet, eleven numbered labels in one run: a frame to measure, the sizes, the greys, the letters, four QR codes, the barcodes and a Barcode Boy card. Each one answers a question on a checklist, and SELECT shows them all on screen first, without spending a centimetre of paper.
A printer guide on the cartridge
Like the other two cartridges, LABEL BOY carries its own reference: nine short articles on the printer, from the protocol it speaks to why thermal paper fades, plus a help page, the settings and an about page. It is a label maker that explains the printer it drives, which is the museum's habit and probably incurable.
Download and browser emulation
The ROM is free to download here. It is an early alpha built around a thirty-year-old printer, so expect the odd rough edge, and if a print comes out wrong on your own machine I would genuinely like to hear about it.
It will run in a browser too, with one honest limitation: a browser has no Game Boy Printer on its link port. Everything up to the preview works, and printing reports that no printer answers, which, for once, is exactly right.
LABEL BOY is an independent homebrew project, not affiliated with, endorsed or sponsored by Nintendo. Game Boy and all product names are trademarks of their respective owners.
Changelog
Built in in three broad steps rather than a day-by-day log:
The scaffolding nobody applauds: First came a menu system, a text engine, a font drawn pixel by pixel and enough of the printer protocol to get a single dot onto paper.
With that standing, the first real build followed: text in four sizes, QR codes, and EAN and Code 128 barcodes all worked out on the Game Boy itself, a live preview, a counter and fourteen memory slots.
Changed the list design to a semi-WYSIWYG editor.
Added templates including a Barcode Boy card, a QR assistant for web addresses, Wi-Fi, contacts and phone numbers, umlauts and thirteen hand-drawn symbols, serial printing from a list, and undo and redo, because a Game Boy with no undo is a cruel teacher.
Added a printer know-how (wiki) and a start screen: the printer checks and driver corrections from the GB Test Lab moved across, a Test sheet was added, and then the genuinely hardest part remained, which was naming it. LABEL BOY won, mostly because it made me smile, which is how this museum makes most of its decisions.
If you have not read them yet: This article explains the protocol the label maker speaks (How the Game Boy Printer works).


Comments